Orbeon and Tomcat for ART-DECOR® Release 2
Steps:
- Check JAVA is installed, otherwise install see Install Sun JAVA JDK
- Install Tomcat
- Install Orbeon
Java openJDK
NOTE
If you have already install java (e. g. during the setup of the backend), please skip this section.
Update / install the JAVA openJDK version.
yum update java-11-openjdk
yum install java-11-openjdk
Something similar to this output should be shown.
> java --version
openjdk 11.0.16.1 2022-08-12 LTS
OpenJDK Runtime Environment (Red_Hat-11.0.16.1.1-1.el7_9) (build 11.0.16.1+1-LTS)
OpenJDK 64-Bit Server VM (Red_Hat-11.0.16.1.1-1.el7_9) (build 11.0.16.1+1-LTS, mixed mode, sharing)
Download and install Apache Tomcat
Download Apache Tomcat
Download Apache Tomcat:
- Select a version Tomcat that supports the installed Java JDK version: https://tomcat.apache.org/whichversion.html
- Use a version before version 10, so 9 or similar
- After choosing a version under Tomcat Donwload (e. g. Tomcat 9 Download), select from the Section Core the
tar.gzbinary distribution - Place the tomcat
*.tar.gzin/opt/art-decor-linux/tooling/packages.
Installation on Mac OS X
Details
Download a binary distribution of the core module: apache-tomcat-x.y.z.tar.gz (where x.y.z should be replaced with the latest stable release of Tomcat. In examples below Tomcat version 9.0.89 is used).
Opening/unarchiving the archive will create a folder structure something like this in your Downloads folder: ~/Downloads/apache-tomcat-9.0.89/apache-tomcat-9.0.89
Move the unarchived distribution to /usr/local:
sudo mv ~/Downloads/apache-tomcat-9.0.89/apache-tomcat-9.0.89 /usr/localTo make it easy to replace this release with future releases, we are going to create a symbolic link that we are going to use when referring to Tomcat:
sudo ln -s /usr/local/apache-tomcat-9.0.89 /Library/TomcatChange ownership of the /Libaray/Tomcat folder hierarchy:
sudo chown -R <your_username> /Library/TomcatMake all scripts executable:
sudo chmod +x /Library/Tomcat/bin/*.shInstead of using the start and stop scripts, you may also want to check out Activata’s Tomcat Controller a tiny freeware app, providing a UI to quickly start/stop Tomcat.
mv apache-tomcat-9.0.89 /usr/share/apache-tomcat-9.0.89
ln -s /usr/share/apache-tomcat-9.0.89 /usr/share/tomcat
Installation on Linux
See also https://linuxize.com/post/how-to-install-tomcat-9-on-centos-7/
Create Tomcat system user
useradd -m -U -s /bin/false tomcatDownload Tomcat
We will download the latest version of Tomcat 9.0.x from the Tomcat downloads page .
As an example assume, that the latest Tomcat version is 9.0.89. Before continuing with the next step, you should check the Tomcat 9 download page to see if a newer version is available.
cd /tmp
wget https://dlcdn.apache.org/tomcat/tomcat-9/v9.0.89/bin/apache-tomcat-9.0.89.tar.gz
Extract the tar
tar -xf apache-tomcat-9.0.89.tar.gzMove the Tomcat files to it to the /usr/share/ directory:
mv apache-tomcat-9.0.89 /usr/share/Tomcat 9 is updated frequently. To have more control over versions and updates, we’ll create a symbolic link called tomcat, that points to the latest Tomcat installation directory:
cd /usr/share
ln -s apache-tomcat-9.0.89 tomcat
The tomcat user that we previously set up needs to have access to the tomcat installation directory.
Run the following command to change the directory ownership to user and group tomcat:
cd /usr/share/tomcat
chown -R tomcat: *
Make the scripts inside the /usr/share/tomcat/bin directory executable by issuing the following chmodcommand:
cd /usr/share/tomcat/bin
chmod +x *.sh
Create a new systemd unit file
vi /etc/systemd/system/tomcat.servicePaste the content as follows.
NOTE
Depending on the memory size of your server, you might consider to set CATALINA_OPTS parameter -Xmx1024M from 1024M to somthing higher, e. g. -Xmx8192M.
[Unit]
Description=Tomcat servlet container
After=network.target

[Service]
Type=forking

User=tomcat
Group=tomcat

Environment="JAVA_HOME=/usr/lib/jvm/jre"
Environment="JAVA_OPTS=-Djava.security.egd=file:///dev/urandom"

Environment="CATALINA_BASE=/usr/share/tomcat"
Environment="CATALINA_HOME=/usr/share/tomcat"
Environment="CATALINA_PID=/usr/share/tomcat/temp/tomcat.pid"
Environment="CATALINA_OPTS=-Xms512M -Xmx1024M -server -XX:+UseParallelGC"

ExecStart=/usr/share/tomcat/bin/startup.sh
ExecStop=/usr/share/tomcat/bin/shutdown.sh

[Install]
WantedBy=multi-user.target
Save and close the file.
Notify systemd that we created a new unit file by typing:
systemctl daemon-reloadEnable and start the Tomcat service:
systemctl enable tomcat
systemctl start tomcat
Check the service status with the following command:
systemctl status tomcatThis should show something simliar to the following output.
● tomcat.service - Tomcat 9 servlet container
   Loaded: loaded (/etc/systemd/system/tomcat.service; enabled; vendor preset: disabled)
   Active: active (running) since Sat 2022-10-15 20:07:29 BST; 25s ago
  Process: 29116 ExecStart=/usr/share/tomcat/bin/startup.sh (code=exited, status=0/SUCCESS)
 Main PID: 29123 (java)
   CGroup: /system.slice/tomcat.service
           └─29123 /usr/lib/jvm/jre/bin/java -Djava.util.logging.config.file=/usr/share/tomcat/conf/logging.properties -Djava.util.logging.manager=org.apache...
Amount of memory for your server
Check the amount of RAM memory on your server:
cat /proc/meminfo | grep MemTotal
MemTotal:       24602824 kB
This output shows this server has 24 GB total RAM memory.
Information pages at exist-db.org:
We would use the following setup:
| amount of MB | used for |
|---|---|
| 8192 | Apache Tomcat |
| 8192 | eXist-db max mem = wrapper.java.maxmemory |
| 2048 | eXist-db cache (approx. 1/3 of exist-db max mem) |
| 2048 | eXist-db db-connection cacheSize (approx. 1/3 of exist-db max mem) |
| 1024 | eXist-db db-connection collectionCache (1/2 of db-connection cacheSize) |
Next set the amount of memory that should be allocated to Tomcat. For that purpose edit again the systemd unit file file to set the amount of memory for Tomcat.
vi /etc/systemd/system/tomcat.serviceChange the following line to your amount:
old:
Environment="CATALINA_OPTS=-Xms512M -Xmx1024M -server -XX:+UseParallelGC"

new:
Environment="CATALINA_OPTS=-Xmx8192M -Xms8192M -server -XX:+UseParallelGC"
Exit vi and save the file with: <esc> :wq
Notify systemd that we changed the unit file by typing:
systemctl daemon-reload...and restart the Tomcat service:
systemctl restart tomcatDownload and install Orbeon for ART-DECOR
Download and install ART-DECOR Orbeon web archive
- Download the art-decor.war file from our repository.
- Place the art-decor.war in
/opt/art-decor-linux/tooling/packages - Please note that since ART 1.6.0+ we use orbeon 4.7. The
art-decor.warthat we install here uses orbeon 4.7.
Copy the art-decor.war archive into the web apps folder of Tomcat.
cp -pr /opt/art-decor-linux/tooling/packages/art-decor.war /usr/share/tomcat/webapps/Restart Tomcat...
systemctl restart tomcat...and check whether check that the ART-DECOR Orbeon war is extracted properly.
ls /usr/share/tomcat/webapps/art-decor/The output should show at least these folders.
META-INF WEB-INFTest the Installation
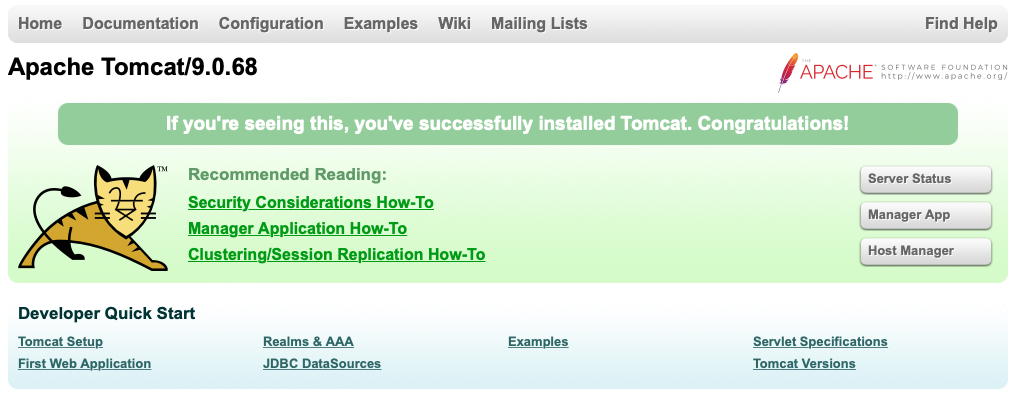
Open your browser and type: http://<your_domain_or_IP_address>:8080.
NOTE
Make sure that your firewall allow access to port 8080.
Upon successful installation, a screen similar to the following should appear:
Configure Orbeon 4 / Orbeon 201x.y
Change the variables that Tomcat passes to client browsers with links to ART-DECOR content (assumes we will use a HTTPS certificate later on):
vi /usr/share/tomcat/webapps/art-decor/WEB-INF/resources/config/properties-local.xmlThe original file contains lines like:
<property as="xs:anyURI" name="art.external.exist.url" value="http://localhost:8877/art"/>Change any property that has external in it's name to point to the Fully-Qualified Domain Name (FQDN) of your server, for example:
<property as="xs:anyURI" name="art.external.exist.url" value="https://<your_domain>/art"/>Exit vi and save the file with: <esc> :wq
Changing default home page
If you want to change to default home page, edit the page flow configuration.
vi /usr/share/tomcat/webapps/art-decor/WEB-INF/resources/page-flow.xmlComment or uncomment the homepage you want to use: home or terminology-home. To use the default ART-DECOR homepage, leave as is.
<page id="home" path="/home" view="http://localhost:8877/exist/apps/art/modules/get-form.xq?form=home"/>Server Settings
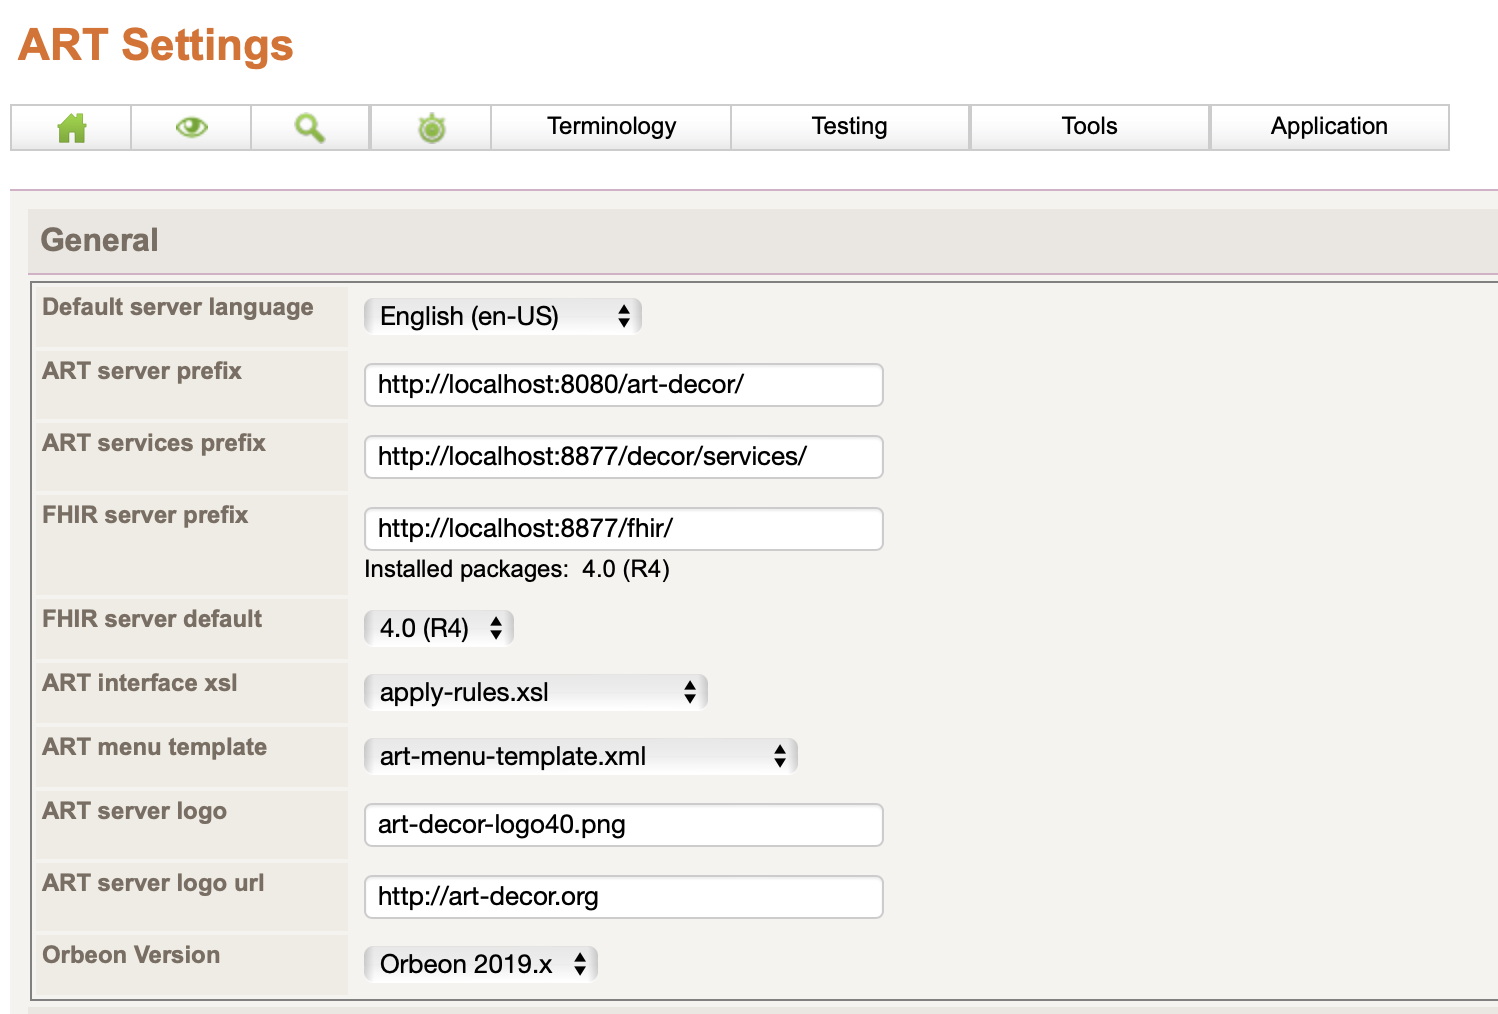
Switch the Server Settings to the proper Orbeon version. Log in as admin and choose Server Settings from the Application menu. Under "Orbeon Version" choose Orbeon 2019.x. You choice is stored immediately.